
Yes, utility shelves. The bookcase's ugly but hard working cousin.
Mrs Toy Making Dad and I took a trip to a certain Scandinavian furniture/home decor/meatball store to buy stuff to start filling in the new spaces in our house. That particular day, some utility shelves were on sale. Dig it. So after 2 hours of saying things like "That's a great price on a Raknorg..." or "I really like that Jork..." we got to the end of the store and were told that they had sold out of the shelves. Grrrrr. It really burnt my Skregnak but I have to accept that you can't always get what you want.
So I resolved just to go to the Big Orange construction/home decor/soft pretzel store by my house and buy some pre-built shelves. Once there though, my inner dude started to light into me. "Dude? Are you not a man? Do you not crave making stuff? Why are you paying for something someone else made? Besides, if you make them then they will be MADE IN AMERICA!" This was one of those rare instances when I wasn't just talking crazy talk to myself. I was right. Yes... it was time to make some sawdust of my own. (The voice also yelled at me for still thinking there are soft pretzels there when the stand has been gone for seven years.)


The shelves were going to be two feet deep to make maximum use of the OSB sheet.
So now some math:
As we all know, 2x4s are really 1.5 x 3.5s.
Two vertical end boards 2 x 1.5 = 3" thick.
36"- 3" = 33" wide shelves. (Total width of structure=36")
Two long shelf supports 2 x1.5 = 3" thick .
24"- 3" = 21" length of short shelf supports. (Total depth of structure=24")
And for us visual learners... (Obviously, the 33" long supports are one piece. I just broke them up here so the diagram wouldn't be huge.)

The 2x4s are 8' long. I used the miter saw to cut 21" off of each end. That left me with 6'3" of 2x4 to be the vertical ends of the shelf. The other boards were cut up and I had very little "waste." (Actually no waste since the scraps will be used for jigs and toy making in the coming weeks.)
Talk about the right tool for the right job... the saw made accurate 90 degree cuts and I flew through them all in hardly any time. It saved me hours. I used a saw horse to support the long pieces of board as I made the cuts.You don't want boards falling while you are cutting. Besides not making clean cuts... it gets pretty dangerous.
 So construction starts with building two "ladders" for the ends. Since the miter saw gave me 90 degree ends, I was in great shape aligning the supports. I made the top and bottom rungs flush and used a scrap block to give me the correct depth. Two 3" screws were used to hold each end. I drilled pilot holes to prevent splitting and lined the screws up diagonally for added strength.
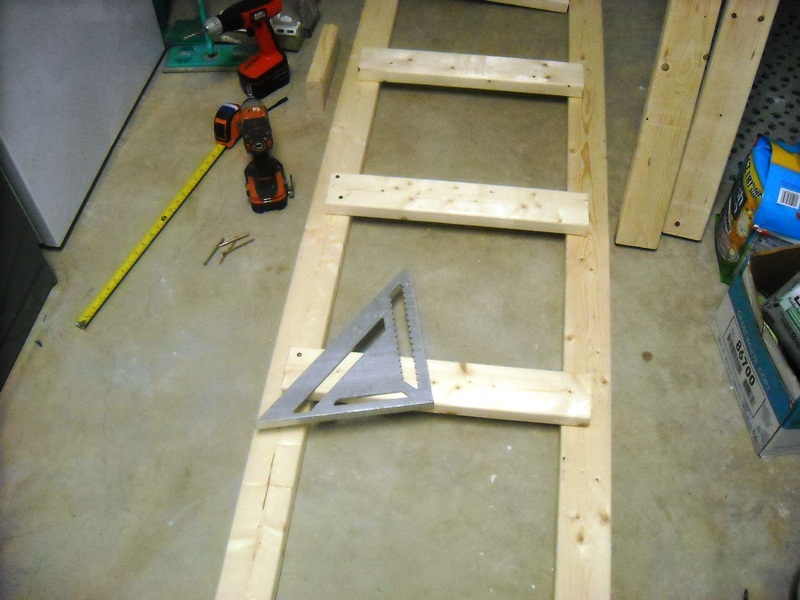 As I moved "up" the ladder, I used a rafter square to line everything up. The shelves are not spaced equally. I knew I wanted the bottom shelf big enough for five gallon buckets but the middle shelves big enough for 2 liter bottles of soda. I ended up with four shelves and a top for a total of five.
  I found the 3" Phillips head screws were pretty difficult to drive. I got a little sloppy and the driver bit slipped out and... FIRST BLOOD FOR THE SHOP!
 About half way through I switched to some "star" drive coated deck screws that went in so easily I began to worry that it was almost too easy.
 Once the two ladders were built in went the cross supports. Again, the rafter square was used and I did the top and bottom first. Once those were in, it was crazy easy to finish the other supports off. I just made sure they were flush and square before drilling and used diagonally spaced pilot holes.
 Okay, I stood it up on end and asked my daughter to shake it. It was so solid that she asked if I had nailed it to the floor. I will say though that there are slight variations in the slab floor so when it got to if permanent location, I did shim it a little.
Last thing is the shelf tops. I did get smart and took advantage of the two free cuts the Orange Store will make. I had a 2'x4' cross cut made in the OSB sheet and then they ripped the remainder into two 2'x6' sheets. Now they fitted into my car and just needed to be trimmed to length at home. MUCH easier than than trying to find a way to cut that huge sheet with a circular saw in a very cramped room.
Again for the visual types. The 2'x4' piece was trimmed to 2'x3' to be the top shelf. (I wanted to secure it to the legs.) The other pieces were made into 2' x 33" shelves with a circular saw using a straight edge clamped to the board as a guide.


As soon as I test fit the shelves, a certain four legged member of the family had to offer his inspection services. Based on the purrs, I think it passed.
The shelves were screwed into the supports with drywall screws. Why? Well... because I had a bunch of them and they would get the job done.
The total cost came out to about $50. More expensive than the Scandinavian shelves I had originally planned for, but much, much sturdier. The Orange Store shelves that are about the same price are not the same size and while sturdier than the first option, are not as strong as these. These are also the exact size I needed for the space and you know what?... It's good to make your own stuff.
I moved it to the corner and within minutes it had all sorts of junk all over it. Mission accomplished

Looks great. Sturdy is good. Making your own is good.
ReplyDeleteHey, if there are no minor injuries, it's not a project!
Also, you might have said it burned your rumpa!
Are you going to offer these shelves on Etsy?
DeleteYes - $50.00 +$600.00 for shipping :)
Delete